Blog

Benefits of Elevated Gardening Beds and How to Build Your Own

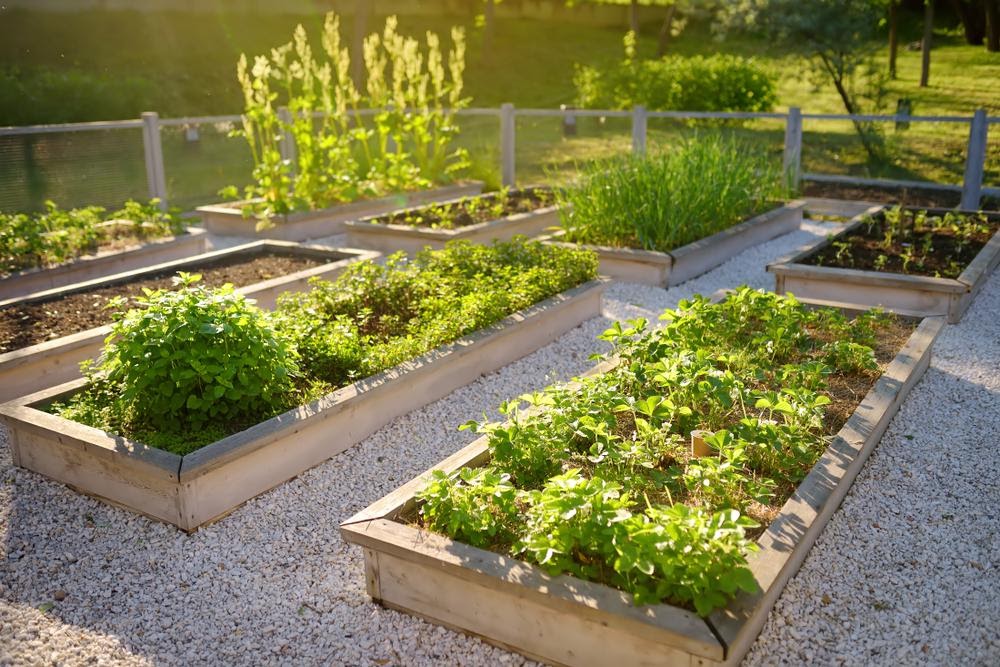
Getting the urge to try out your green thumb? Elevated or raised bed gardens are one of the most convenient and attractive ways to add vegetables or flowers to your yard. While many people find the process of making a raised bed intimidating, there is little to worry about. A raised bed can come together in an afternoon with the right materials.

Reasons to Choose Raised Beds

Raised beds have several advantages over ground-level planting. They offer better drainage, which can prevent root rot. Raised beds make it easy to improve your soil to raise fuller, more vibrant plants. They are also easier to work with because you do not have to bed as far in order to use them.

When you start a raised bed with fresh soil, you can avoid many of the weeds that can be a problem when using the topsoil already in your yard. This means less time weeding and less competition for the plants you want to grow.

A raised bed garden is also aesthetically pleasing. Create multiple beds with paths between to add a calming garden oasis to your yard.

How to Build a Raised Bed Garden

Putting in elevated beds is far easier than it looks. Choose the wood for your border and decide how tall you want your beds to be. Depending on your carpentry skills, you can either build the entire bed yourself or buy premade corner brackets. 

Best Wood Choice for Elevated Beds

Many people recommend cedar because this wood is naturally rot-resistant. However, juniper and redwood are also good choices. Choosing rot-resistant woods will ensure that your beds last longer. Many well-constructed beds can last 15 years or more. Our treated MicroPro lumber is also a safe alternative for raised garden beds.

Setting Dimensions for a Raised Bed

How tall the bed should be depending on the soil beneath. If you have good soil that roots can penetrate, a bed that is only six inches high can be sufficient. The most common bed height is 11 inches, which can be accomplished by stacking two six-inch boards. The maximum height for a raised bed is about 36 inches.

Whatever height you choose, remember that you have to add soil to fill it. Additionally, taller beds will need more support than shorter ones because of the weight and pressure of the soil. 

Beds should be no more than four feet wide. This allows you to reach the center of the bed without stepping on and compressing your soil. The bed can be as long as you wish. Just be sure to add cross supports every four to six feet.

Choosing Soil for a Raised Bed

You can use the topsoil from your yard; however, adding soil to a raised bed is an opportunity to choose rich, weed-free soil with improved drainage.

Many people start their first garden with purchased soil. A mix of 1/3 peat moss, 1/3 vermiculite and 1/3 compost offers both drainage and nutrition for plants. If you have a supply of compost at home, you can also make a homemade soil with half compost and half topsoil.


For building supplies and more information on your next home improvement project, stop on in our store or give our team at Nuzum Building Supplies a call! 


Benefits of Installing a Ceiling Fan

When the summer months come knocking at our doors, it’s quite difficult to stay cool and refreshed. It’s even more difficult to stay inside our house because the air is all hot and humid. At the end of the day, we’ll be sweating profusely and truly exhausted from all the heat.

Luckily, there are a lot of ways to make our rooms breezy during the sweltering season. One perfect method is to install a ceiling fan.

What Is a Ceiling Fan?

As the name suggests, a ceiling fan is a fan that is suspended from the ceiling of a room or space. It has hub-mounted rotating blades that help circulate air, thus producing a cooling effect in the nearby area.

What Makes A Ceiling Fan Beneficial?

·       Ceiling Fans Are Also Great for Cold Weather

Most people simply associate ceiling fans as devices to cool down a room. But in reality, ceiling fans are a lot more flexible than that — because they can actually bring warmth to a space as well.

This is because ceiling fans have two settings that dictate the direction of the blades. You can create either a downdraft or an updraft. With the downdraft, the air is blown downwards, thus cooling the area beneath. Meanwhile, the updraft setting draws the cooler air upward so that the warmer air near the ceiling is the one that’s circulated below.

In other words, the ceiling fan is a versatile device because you can use it both during the summer and winter.

·       Ceiling Fans Help Get Rid of Insects and Pests

Summer isn’t just the season for heat and humidity — it’s also the season of bugs, insects, and pests invading our houses. Luckily, if you have a ceiling fan, it’s easier to get rid of them. This is because the breeze works against them, so they’re practically blown away by the airflow produced by the fan.

As a result, not only will a ceiling fan refresh you, but it will also guard you against bothersome insects.

·       Ceiling Fans Can Also Provide Light and Beauty

Over the years, ceiling fan manufacturers have added more functionalities and designs to the products. As a result, the ceiling fans we can find nowadays already come with an extra lighting feature, as well as a stunning design.

This makes ceiling fans a great addition to any room. It will help cool or warm the place, and at the same time, it brightens the place and looks great in the view.


Ceiling fans are a lot more flexible and versatile than we actually think. They can cool down a room or warm it, and they also have a light feature and beautiful design.

Because of this, it’s a great idea to have a ceiling fan in at least one room of your house. Give our team a call at Nuzum Building Supply for everything you need for your project.

Your Step-by-Step Guide on How to Refurbish Old Doors

If your beloved front, back, or side door is starting to look worse for wear, then it’s time to break out your tools and get to work. By refurbishing your old door, you can bring it back to life and highlight everything you love about it. You will only need a little bit of know-how and a whole lot of gumption to get this project done right. So, if you’re ready to tackle this project, just follow these steps to refurbish your old door.

  1. Get All Your Tools and Supplies

To refurbish old doors and make them look like new again, you will need:

  • Flathead and Philips screwdrivers
  • Sawhorses
  • Drop cloths
  • Painter’s tape
  • Newspaper
  • Wood filler
  • Power sander
  • Tack Cloth
  • Sanding block
  • 120 to 240-grit sandpaper
  • Rags
  • Paintbrush
  • Wood stain
  • Clear varnish
  • Safety goggles
  • Dust mask

Once you have these items in hand, you can continue through the following steps. Remember to always wear your safety goggles and dust mask while sanding and staining.

  1. Take Off the Doorknob, Hinges, and Other Hardware

Using your screwdriver set, take the door out of the frame. Then, take it to your work area and place it across your sawhorses that are sitting over a drop cloth. Remove the doorknob, hinges, and all the other hardware. If the door has a window, tape it off with painter’s tape and newspaper.

  1. Sand to Remove the Old Finish

You must remove the old finish in full to restore the look of your door. To do so, start by putting 120-grit sandpaper on your power sander. Sand off the finish on all the flat surfaces on both sides while being careful to avoid rounding out any edges. Then, sand by hand around all the intricate details in the door using the same grit sandpaper. When sanding, use tack cloth to help pick up particles of dust to achieve a smoother look.

  1. Fill in All Imperfections and Sand Smooth

With the old stain removed, closely examine the door for imperfections. If you find any, fill them in with wood filler and let it dry as directed on the container. Then, come back with 240 grit sandpaper on your power sander and by hand to smooth out the entire door on both sides.

  1. Apply the Stain to the Surface

After your door is smooth to the touch, you can start applying the stain using your paintbrush. Work in small sections, saturating the wood with stain, and then wiping away the excess with a rag. Let the stain dry overnight and put on another coat if you want a darker finish. If you want a shinier finish, apply a coat or two of clear varnish after the stain dries.

  1. Reinstall the Hardware

Let the stain cure overnight once again. Then, grab your old hardware or any updated pieces you want to install and put them in place using your hand tools. If you’re using the old hardware, you may need to oil the hinges or doorknob to improve their function.

  1. Put Your Door Back Up

With all the hardware installed, you can put your door back up in its rightful place in your home. Then, be sure to step back and admire your hard work.


Although refurbishing doors is well worth the time and effort, you can skip all the trouble by getting a new door with help from our team at Nuzum Building Supply. We can help you find a door that complements your home design and exceeds all your expectations. So, give us a call today at 608-637-2116 to get started.

Interior Painting Tips: How to Paint Like a Pro

A fresh coat of paint can breathe new life into your home. Painting interior walls is something many homeowners choose to tackle themselves, but you don’t have to sacrifice the quality of the finished job if you do this as a DIY project. With these tips and quality products from Nuzum Building Supply, you can paint just like a pro!

  1. Preparation is Powerful

Before you begin, prep the surface carefully. Oil, grime, and dust on the wall will destroy the final look of your paint job. So will holes in the wall.

Check the surface of your wall for cracks, flaking, and peeling, and sand or scrape these areas to remove the texture. Then, apply a powerful cleaner to remove dust and stains. Fill in holes with putty and allow it to dry thoroughly. Wash grease spots with soap and water.

Prep the room, too. Use canvas drop cloths on floors and furniture that isn’t removable. Sheets won’t protect from paint bleeding through, and plastic is slippery if paint spills on it.

  1. Don’t Skimp on the Quality

Both your pant and your rollers and brushes should be high quality. You’re probably doing the job yourself to save a little money but skimping here will mean a far less effective pant job. Cheap brushes and rollers will shed on your wall, and cheap paint will require more coats, which will then end up costing more. Our Valspar Interior Paint is a great choice. It goes on smoothly and holds up well for years after you paint.

  1. Know When to Use Primer

Primer is helpful to give you a good finish on your paint job, but not every job requires it. Primer is ideal when you’re covering a pattern, such as a mural painted on the wall, or going from a dark color to a light color. It can also help you get an even coat if you’re painting with a very similar color to what you had before.

  1. Use Paint Extender

Paint extender gets mixed into your paint before you paint. It helps even out the paint, which means you won’t see any overlapped areas or brushstrokes. Extender also lengthens the drying time. While this might not seem like a good thing, it actually helps you by giving you more time to check for mistakes and fix them before the paint totally dries.

  1. Do One Wall at a Time

Complete one wall at a time, then step back and look over it carefully, fixing mistakes before moving to the next wall. This gives each wall in your home a seamless look, even if it makes the panting job take longer.

  1. Wash Paint Rollers

Paint rollers are the best tool to paint your walls because they evenly coat, but one problem with them is the fuzz they can leave behind. Washing them with hot water and dish soap will help. This removes the fuzz and fibers and conditions the roller for the work ahead. You can use them immediately even while they’re still wet.

  1. Light It Up

Shine a work light on the wall as you paint, especially in the edges where you have to switch to a brush instead of a roller. This will help you see all of the mistakes and fix them as you go. Even if the room seems well-lit, ad a work light.

Are you ready to get started on your project? Give us a call or visit one of our stores to talk to one of our sales representatives for help finding the perfect paint supplies.


7 Best Gift Ideas for a DIY Lover

If you have a loved one in your life that loves DIY projects, you may be wondering what to buy for them. We’ve compiled a list of seven great gift ideas for DIYers of every skill level.

  1.     Magnetic Pickup Tool

No matter what the task is, dropping metal pieces like nails and screws happens to everyone. And of course, these objects seem to find their way to the most inaccessible places in your shop. An extendable magnetic wand is a perfect tool for anyone who has had to crawl on the floor to retrieve a missing screw from under the workbench.

  1.     Digital Multimeter

No Electrical tool kit is complete without a multimeter. Today’s digital models are rugged, easy to use, even with gloves on, and sport extra-large displays. It’s also an excellent tool to help young or inexperienced DIYers learn more about electrical currents and how they work.

  1.     Storage Organizer

It doesn’t take long for a DIYer to gather a collection of nuts, bolts, washers, and screws left over from older projects. Keeping them safe and organized is always a challenge. Storage organizers come in a range of shapes and sizes, so there’s a perfect solution for every workspace.

  1.     Drill Attachments

Every drill comes with a basic set of drill bits. However, the average DIY enthusiast will quickly find that the included bits are made of cheap metal and break. Sometimes, they don’t come in the right sizes and types. An aftermarket attachment set offers a wide range of bits and attachments, including everything from screwdriver bits to hole saws.

  1.     Laser Level

Every DIYer probably has a level already. Upgrading to a laser level is a great way to help them up their game. They can use it to hang pictures, install shelving, lay floors, hang wallpaper, and more.

  1.     Work Gloves

A good pair of gloves is an essential tool for a DIYer. Whether they are working under the hood, on the roof, or in the garden, Look for gloves that offer extra protection for the thumb and index fingers. Machine washable gloves are a plus.

  1.     Gift Card

If you don’t know what to buy, a gift card, so your DIYer get what they want. Just choose a store or website where they enjoy shopping.

DIYers come in every kind. There’s almost no limit to the projects they might take on. With the right tools, you can help them stay busy!

3 Ways to Winterize Your Home and Save on Energy Cost

It’s that time of year again: cozy evenings spent by the fire, hot apple cider, holiday cheer and… higher heating bills? Not necessarily!

With colder temperatures just around the corner, now is the time to take steps to lower your energy costs. Fortunately, winterizing your home doesn’t have to be difficult or costly.

Here are three ways to prepare your home for winter before the snow and sleet hit.

  1. Stop the Drafts

Though they may not be visible, holes, cracks or seams in your home’s walls, windows and doors allow cold air to sneak in and warm air to escape… so you need to seal them. Start by walking your home’s exterior and looking for gaps around windows and doors. Don’t forget to check hose faucets and where siding meets the foundation. Use expanding foam sealant or acrylic-latex caulk to fill the gaps.

Next, inspect the weather stripping. Close a piece of paper between the window or door and the frame. If you can pull the paper out, it’s time to replace the stripping. Self-adhesive stripping — available at hardware and home improvement stores — offers an easy DIY fix.

Now seek out drafts inside your home. Choose a cold day and stand near doors, windows and electrical outlets. If you feel air movement or notice cooler temperatures in certain areas, fill gaps with caulk and insulate outlet covers with foam gaskets.

You can use a lighted stick of incense to find drafts. Simply hold the incense near windows and doors and watch how the smoke moves. If it streams away, you’ve found a crack.

Finally, place draft guards underneath doors to prevent drafts and heat loss. You can purchase pre-made guards or simply roll up a towel.

  1. Optimize Your HVAC

Your furnace works hard to keep you warm, so give it some TLC to keep it running smoothly. If it’s been a while since you checked the filter, now is a great time to replace it.

Dirty filters obstruct air flow, which makes your furnace work harder and run for longer periods to heat your home. Not only does replacing the filter on a regular schedule — generally, every one or two months — help lower your heating bills, it can keep your furnace purring along for longer.

Reduce energy costs by turning the thermostat down to 68 degrees while you’re awake and lowering it when you’re sleeping or out of the house. According to the U.S.. Department of Energy, lowering your thermostat by seven to 10 degrees for eight hours each day will reduce annual utility costs by up to 10 percent. A “smart” or programmable thermostat makes it even easier to increase efficiency.

  1. Shore Up Your Windows

We’ve already talked about sealing window frames with caulk and installing new weather stripping. But on the coldest days, your windows will still let in the chill.

One easy fix? Seasonal insulated curtains that keep cold air out and warm air in. Just remember to keep the drapes closed when sun isn’t shining directly on the windows. For a more permanent solution, install insulated blinds.

You may also install window insulation film. While it may not be pretty, it’ll help reduce heat loss by up to 70 percent.


Don’t forget to a peak in the attic to see how much insulation is in the space. A minimum of 12″ is recommended. Blown in insulation is a very easy and economical solution to heat loss through the roof!

Don’t let chilly temperatures leave you in the cold! These winterization tips will keep your home toasty and help you save on energy costs this winter.


Effective Ways to Clean Your Kitchen Cabinets

Being the focal point for every kitchen, dirty cabinets are easy to spot. This is not surprising because cabinets do not receive the same attention as the counters, sinks and floors when it comes to regular cleaning. This is despite the fact that they receive everyday food splatters, water marks, grease, dust and fingerprints.

The problem is even bigger when the dirt accumulate overtime creating sticky situations that are a nightmare to clean.  Dirty kitchen cabinets also pose a health risk because bacteria like salmonella can contaminate the entire food prep area.

Cabinet cleaning schedule

In order to maintain your cabinets and keep them clean, you need to have a cleaning schedule that alternates between general cleaning and deep cleaning. With a constant weekly general cleaning, you’ll only need to deep clean occasionally.


How to do a general cleaning of your cabinets

Start by collecting the cleaning equipment and materials that you need. These are cleaning cloths, a soft- bristled brush, dish soap, vinegar or a warm water solution and a special cabinet cleaner like orange oil. Optionally, you might need a vacuum, baking soda and an all-purpose cleaner. The basic cleaning solution for all cabinet materials is a solution of dish soap and warm water or white vinegar and warm water. Unlike the majority of all-purpose cleaners, these solutions remove most of the food smudges, dust and grease buildup without damaging the cabinet’s finish.

Spray the solution directly onto the surfaces or onto the cleaning cloth and wipe the cabinet surfaces from top to bottom. Remember not to soak the cabinets as too much moisture can damage the finish. Also, don’t let the water run into the hinges to avoid rust.

Once the cabinets are wiped clean, remove the cleaner with a final rinse using a lightly dampened clean cloth. Finally, use a dry soft cloth to wipe all the cleaned surfaces dry. Don’t let them air dry because it can bubble the finish or paint.  Clean the glass and metal hardware thereafter.

Cleaning tough spots

When your cabinets have sticky yellowish or orange grease grime, dried grunge or other food stains on them, it can be hard to remove it with dish soap or a vinegar solution. In this case, apply orange oil cleaner and let it sit for a few minutes before scrubbing with a soft brush. You can also apply a paste of baking soda, salt and water then scrub the area with an old toothbrush.

Deep cleaning your kitchen cabinets

Deep cleaning of kitchen cabinets can be done at least twice a year. This means emptying of the cabinets entirely before cleaning them in and out using the procedures outlined for general cleaning. This is also the time to clean the cabinet contents and throw away anything that is expired, heavily chipped, cracked or missing a lid.

After cleaning your kitchen cabinets, try to maintain the cleanliness by cleaning spills as they happen with a sponge or damp cloth. To protect from future stains, apply a mixture of vegetable oil and vinegar lightly on the cabinet surface then rub with a soft cloth until it shines.

For further advice on your kitchen cabinets or next home improvement project, give the professionals at Nuzum Building Supply a call!

5 Tips When Painting the Exterior of Your Home


There are a lot of decisions and preparations that go into painting your home’s exterior. You have to find the right paint color, use the right tools, and have some knowledge of what you are doing. It isn’t easy but that is why we have curated the best tips to help make exterior painting a breeze!

Here are 5 tips you should know when painting the exterior of your home:

  1. Consider Mother Nature – Don’t forget about the weather! It is important to pay attention to the weather if you are going to be outside all day painting. Select a dry time of the year when there is little rain and humidity. Paint needs to dry and will not adhere to surfaces correctly if they are not dry.
  2. Quality Over Price – The better the paint quality, the fewer times you’ll need to repaint over the years. Paint technology has improved so much that most colors are guaranteed to last longer than they have before. You may be tempted to save some money on cheaper paint, but that will only cause you more trouble, and more money down the road!
  3. Sand and Wash – Paint doesn’t adhere to wet surfaces, as well as dirty and rough surfaces. Clean the siding and trim around your house. Allow that to dry, then sand. This will ensure the smoothest paint finish.
  4. Use Primer – Its always been a rule to apply a good coat of primer before your color. This will have the color looking brighter and lasting longer. However, new paint technologies have combined paint and primer into one product, which ultimately will save you money compared to buying two separate products. If your perfect paint color doesn’t include primer in the mix, make sure you apply some before!
  5. Work from Top to Bottom – Start working your way from the top of the house to the bottom. This will help control streaks, as well as having you work with gravity rather than against it! Drips are going to happen, so this method will help you fix those as you are working rather than having to go backwards.


While painting the exterior of your home can be something you can do yourself, if you don’t feel prepared enough, that’s okay. Hiring a professional painter to get the labor done instead could be the better option. For advice and contractor recommendations, give the team at Nuzum Building Supply a call!

How to Improve Your Kitchen

Planning an upgrade or new kitchen from scratch can be a tough and stressful process.

If you do not know where to start, first do your research on your kitchen preferences and contact the building design professionals here at Nuzum!

Working with professionals will help you choose the right cabinet colors, cabinet hardware and cabinet layout. You want to ensure that your cabinets are beautiful, compliment your space, and are designed with a purpose so that all your belongings fit neatly. Knowing how many items you need to store will also be a big help in deciding how much storage space your kitchen needs.

Follow these simple steps to improving your kitchen:

  • Call and set up an appointment for an in-home design so that the designer, as well as carpenters and contractors can inspect the area, discuss your vision, and take measurements!
  • Design the layout of the kitchen by choosing the proper shape for your needs. Whether you have a large family, a large business, a small family or a small business, each kitchen needs to be tailored to fit your needs so that you enjoy your kitchen and it helps make your life easier!
  • Create a path by discovering and discussing how your family or business moves throughout the kitchen. In which order do you like to move from the refrigerator, to the sink, to the oven, and back to the island counter top to prepare a meal?
  • Decide your kitchen shape. Would you benefit from an L-shaped kitchen, a U-shaped kitchen, a kitchen on a single wall, or a G-shaped kitchen? Remember to think about the outer area to have to work with and around!

Each kitchen layout creates the perfect floor plan for your unique space and needs. Efficiency can be achieved by well thought-out plans. Enhancing the space with proper cabinetry will create wonderful storage for all belongings and the right floor plan will ensure no more traffic jams!

You can still enhance your kitchen without making major remodeling improvements. Repainting your cabinets and your cabinet hardware can really change the look of your kitchen. Work within your needs and your budget to give yourself a functioning dream kitchen!

3 DIY Kitchen Cabinet Ideas Anyone Can Build

It’s a Great Time for a Do-It-Yourselfer

The access to Internet makes it easier than ever before to find ideas, inspiration, and instructions for an enormous variety of DIY projects. However, not every project you see online is quite as easy as it looks. Many of the supposedly DIY projects you may find were actually done by accomplished craftsmen and designers.

There is good news, though. Many projects are simple enough for nearly anyone to do, even with limited skills and tools.


Here are 3 DIY cabinet ideas that anyone can build:


  • Disappearing Dishwasher

Many dishwashers are available in “panel-ready” versions. The dishwashers that also known as concealed or integrated dishwashers are designed to accept a panel that matches the existing cabinets in your kitchen. A simple panel can transform your dishwasher from an unattractive eyesore into just another lower cabinet. This can give your kitchen a seamless look typically found in a high-end home.

You can buy custom cabinet panels online or make your own. Either way, it doesn’t take much time or money to transform your kitchen with this simple upgrade.


  • Chicken Wire Doors

Open cabinets are a restaurant kitchen staple. In the home kitchen, however, most people don’t want their cabinets exposed like that. Replacing your cabinet doors with chicken wire is an easy way to add some country appeal to your kitchen.

You can complete this easy project in an afternoon, but the impact is much more significant than the effort. If you want a vintage look with just a touch of the whimsical for your kitchen, DIY chicken wire cabinet doors could be just what you’ve been looking for.


  • Under Cabinet Lighting

Too many kitchens, especially in older homes, suffer from a lack of adequate task lighting. Today, it’s easier than ever to transform a dark, shadowy kitchen into an inspiring space. This transformation is easy with DIY under cabinet lighting.

Kitchen under cabinet lighting is an easy project that any DIY’er can take on. If you opt for battery-powered LED lights,

Battery-powered LED lights, you can complete the task in about five minutes, with no wiring required. If you prefer a slightly more permanent installation, you can drill a few holes and route a power cord. You can often find an extra outlet in an upper cabinet behind the microwave.


Call the Professionals at Nuzum

While many kitchen upgrades are best left to professionals, just about anyone who can hold a screwdriver can handle these simple DIY cabinet projects. Get all of your necessary tools, building supplies and professional advice here at Nuzum!