Why Should You Choose a Local Lumberyard?

Having high-quality wood is vital to every new construction or renovation project. Whether you’re a contractor or a homeowner tackling your own project, there are many options when it comes to purchasing lumber. You may choose to buy your materials from big-box stores, or in local lumberyards.  

While both big-box retailers and local companies offer a great selection of raw materials, the latter provides a more personalized and convenient shopping experience for buyers. Here are some reasons why our full-service lumberyards are the best sources for wood: 

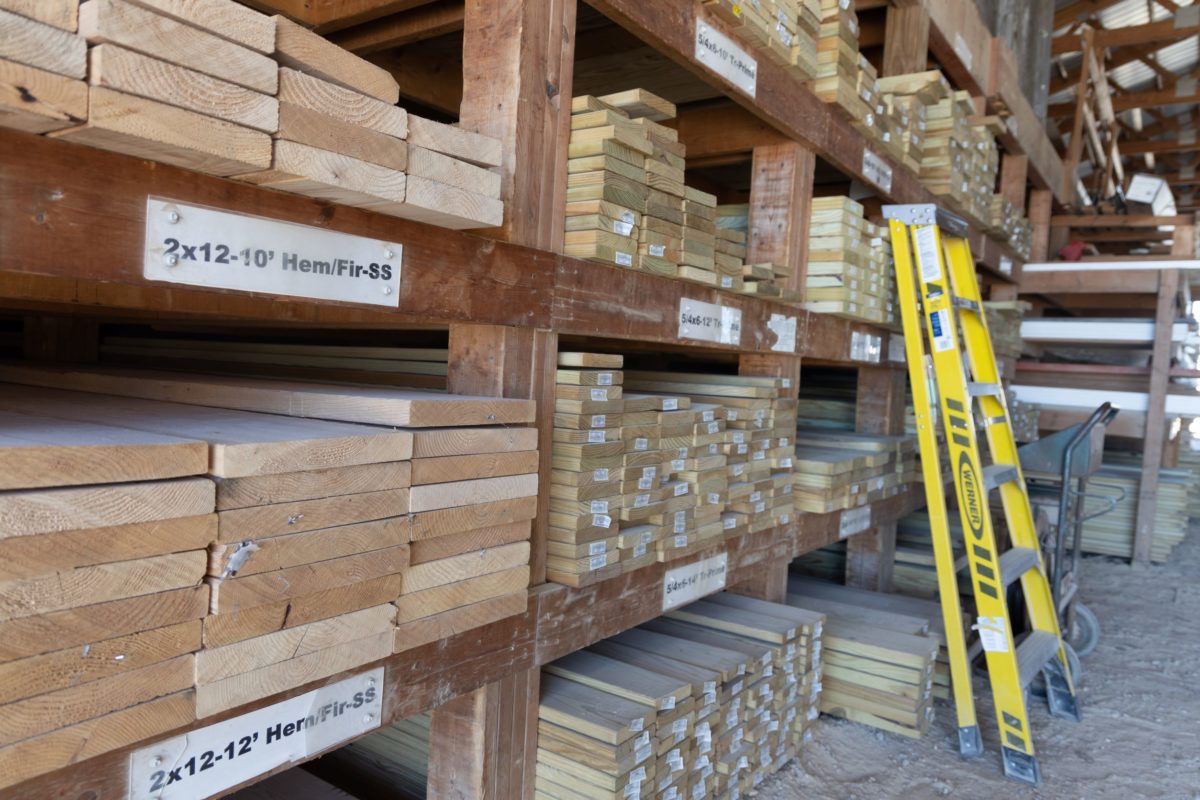
Wide Selection of Wood Materials

Most home improvement stores only carry basic types of wood. If you’re looking for specific materials, full-service lumberyards like NuZum Building Supply might be the best option for you. We offer a wide selection of durable yet aesthetically pleasing products that suit any new build or renovation. 

We also offer custom lumber cuts if our standard sizes aren’t what you need for your current project. You supply the exact measurements, and we will cut the wood to size. 

We Only Source From Reputable Suppliers

At NuZum Building Supply, we only provide our customers with the best possible quality of materials. We make sure to pick reliable suppliers to ensure consistency in the quality.  

Our team is also aware of the different factors that may affect our supplies. We implement strict storage and handling measures to preserve the condition of our lumber products. By doing this, we’re able to provide straight, durable, and superior wood. 

Our Team Is Comprised of Lumber Experts

Having too many options can be overwhelming, especially for first-time buyers. At NuZum Building Supply, we have you covered. We take great pride in having extensive knowledge and experience when it comes to different wood products.  

Compared to big-box stores, we won’t let you wander around our lumberyard looking for answers. We’ll guide you in selecting the right wood materials, cuts, and grain patterns to best fit your project. If you have any questions, we’ll be more than happy to help.

You Can Get High-Quality Products at Competitive Prices

High-quality wood products don’t have to be expensive. While prices may vary per wood species, our team at NuZum Building Supply always strives to help lessen the costs for our clients. 

We often buy lumber in bulk, helping us reduce rates and provide our customers with competitive pricing. When you choose us, we can assist you in finding supplies that suit your budget. 

Trusted Supplier of High-Quality Lumber

If you’re looking for a trusted direct wood supplier around Viroqua, WI, turn to us! Contact us at NuZum Building Supply to discover more about our products.

10 Tools in Every DIY Pro’s Toolkit

You love DIY projects. Whenever something needs to be made, built, or fixed around the house, you’d much rather do the job yourself than call a professional. But in projects like this, you’re only as good as your tools. You’ve moved beyond the standard hammer, screwdriver, pliers, and wrench. What kind of tools do you need to be a real DIY pro? Here are our top 10 picks.


  1.     Circular Saw – There are a lot of different types of saws out there, but this one is probably the most versatile. Much straighter, smoother, and more controlled than a regular handsaw, a circular saw allows you to cut wood of just about any size, from a 2×4 to a sheet of plywood, quickly and easily. With a few specialized extra blades, you can also cut through other things, such as metal, brick, granite, and more.


  1.     Jigsaw – The circular saw is good for cutting straight. The jigsaw is good for cutting different shapes. If you need to cut out a curved piece of wood, or wood shaped in a specific pattern, a jigsaw is what you’ll use. You can also use it in a pinch to bore holes into everything from wood to metal to ceramic tile.


  1.     Cordless Drill – This is important for putting in screws of all types, as well as drilling pilot holes. You’ll use your drill in just about every DIY project. And cordless means you can use it anywhere, without having to worry if the cord is long enough, you have enough extension cord, or if the cord will get in the way. You’ll also need as wide an array of drill bits as possible, in all different sizes and head types.


  1.   Level – Whether you’re hanging a picture, making a cabinet, or building a new deck, you need a good, sturdy, metal level, to make sure everything is even. Many beginners use a cheap, plastic level, but a metal one is sturdier, lasts longer, and is less prone to wear and tear and other damage over time.


  1.     Angle Grinder – Your angle grinder is one of the most versatile tools in your toolbox, and can be used for all sorts of different things. Clean rust and paint off of metal objects. Sharpen your metal tools. Cut bolts down that are too long. You can even use it to cut through stone or concrete.


  1.     Random Orbital Sander – There are a number of different types of sanders available, from disc to belt, but the most common and most versatile is the random orbital sander. They’re fast, powerful, and can be used for most sanding jobs. They can also sand smoothly even against the grain, and eliminate swirl marks. You may decide to get more diverse and specialized sanders down the line, but the random orbital is the best one to start with.


  1.     Nail Gun – This will replace your hammer in most jobs, particularly ones with a lot of nails to put in. Used with an air compressor, not only is your nail gun faster than a hammer, with a lot less effort, but the nails go smoother and straighter, and look much more professional.


  1.     Impact Driver – Similar to a drill, an impact drill has more torque and multiple speeds, so it’s typically used for heavier jobs, such as fastening bolts or anchoring screws into concrete walls. It can also be used in a pinch as an impact wrench. The extra power makes it easy to over-tighten screws, though, so continue to use a regular power drill for jobs that aren’t as heavy duty.


  1.     Router – A router is great for making smooth edges in wood. You can also use it for decorative molding, as well as intricate patterns and designs. Plus, it’s great for cutting dados: joints or trenches in a piece of wood that allows it to link together securely with another piece of wood.


  1. Rotary Multi-Tool – Used for more intricate and detailed work, a rotary multi-tool has a variety of different attachments for different jobs. In addition to sawing, scraping, and sanding, it can be used to polish jewelry, etch glass, carve wood, or even engrave leather. You can also use it for sharpening and cleaning other tools.


Over time, as your DIY skills grow, your tool collection will grow as well. Likewise, as your tool collection grows, your DIY skills will grow, as you become more proficient with a wider array of tools. What tools do you most want to add to your toolbox, and what projects are you looking forward to completing with them? Contact the team here at NuZum Building Supplies today! 


Benefits of Elevated Gardening Beds and How to Build Your Own

Getting the urge to try out your green thumb? Elevated or raised bed gardens are one of the most convenient and attractive ways to add vegetables or flowers to your yard. While many people find the process of making a raised bed intimidating, there is little to worry about. A raised bed can come together in an afternoon with the right materials.

Reasons to Choose Raised Beds

Raised beds have several advantages over ground-level planting. They offer better drainage, which can prevent root rot. Raised beds make it easy to improve your soil to raise fuller, more vibrant plants. They are also easier to work with because you do not have to bed as far in order to use them.

When you start a raised bed with fresh soil, you can avoid many of the weeds that can be a problem when using the topsoil already in your yard. This means less time weeding and less competition for the plants you want to grow.

A raised bed garden is also aesthetically pleasing. Create multiple beds with paths between to add a calming garden oasis to your yard.

How to Build a Raised Bed Garden

Putting in elevated beds is far easier than it looks. Choose the wood for your border and decide how tall you want your beds to be. Depending on your carpentry skills, you can either build the entire bed yourself or buy premade corner brackets. 

Best Wood Choice for Elevated Beds

Many people recommend cedar because this wood is naturally rot-resistant. However, juniper and redwood are also good choices. Choosing rot-resistant woods will ensure that your beds last longer. Many well-constructed beds can last 15 years or more. Our treated MicroPro lumber is also a safe alternative for raised garden beds.

Setting Dimensions for a Raised Bed

How tall the bed should be depending on the soil beneath. If you have good soil that roots can penetrate, a bed that is only six inches high can be sufficient. The most common bed height is 11 inches, which can be accomplished by stacking two six-inch boards. The maximum height for a raised bed is about 36 inches.

Whatever height you choose, remember that you have to add soil to fill it. Additionally, taller beds will need more support than shorter ones because of the weight and pressure of the soil. 

Beds should be no more than four feet wide. This allows you to reach the center of the bed without stepping on and compressing your soil. The bed can be as long as you wish. Just be sure to add cross supports every four to six feet.

Choosing Soil for a Raised Bed

You can use the topsoil from your yard; however, adding soil to a raised bed is an opportunity to choose rich, weed-free soil with improved drainage.

Many people start their first garden with purchased soil. A mix of 1/3 peat moss, 1/3 vermiculite and 1/3 compost offers both drainage and nutrition for plants. If you have a supply of compost at home, you can also make a homemade soil with half compost and half topsoil.


For building supplies and more information on your next home improvement project, stop on in our store or give our team at Nuzum Building Supplies a call! 


Benefits of Installing a Ceiling Fan

When the summer months come knocking at our doors, it’s quite difficult to stay cool and refreshed. It’s even more difficult to stay inside our house because the air is all hot and humid. At the end of the day, we’ll be sweating profusely and truly exhausted from all the heat.

Luckily, there are a lot of ways to make our rooms breezy during the sweltering season. One perfect method is to install a ceiling fan.

What Is a Ceiling Fan?

As the name suggests, a ceiling fan is a fan that is suspended from the ceiling of a room or space. It has hub-mounted rotating blades that help circulate air, thus producing a cooling effect in the nearby area.

What Makes A Ceiling Fan Beneficial?

·       Ceiling Fans Are Also Great for Cold Weather

Most people simply associate ceiling fans as devices to cool down a room. But in reality, ceiling fans are a lot more flexible than that — because they can actually bring warmth to a space as well.

This is because ceiling fans have two settings that dictate the direction of the blades. You can create either a downdraft or an updraft. With the downdraft, the air is blown downwards, thus cooling the area beneath. Meanwhile, the updraft setting draws the cooler air upward so that the warmer air near the ceiling is the one that’s circulated below.

In other words, the ceiling fan is a versatile device because you can use it both during the summer and winter.

·       Ceiling Fans Help Get Rid of Insects and Pests

Summer isn’t just the season for heat and humidity — it’s also the season of bugs, insects, and pests invading our houses. Luckily, if you have a ceiling fan, it’s easier to get rid of them. This is because the breeze works against them, so they’re practically blown away by the airflow produced by the fan.

As a result, not only will a ceiling fan refresh you, but it will also guard you against bothersome insects.

·       Ceiling Fans Can Also Provide Light and Beauty

Over the years, ceiling fan manufacturers have added more functionalities and designs to the products. As a result, the ceiling fans we can find nowadays already come with an extra lighting feature, as well as a stunning design.

This makes ceiling fans a great addition to any room. It will help cool or warm the place, and at the same time, it brightens the place and looks great in the view.


Ceiling fans are a lot more flexible and versatile than we actually think. They can cool down a room or warm it, and they also have a light feature and beautiful design.

Because of this, it’s a great idea to have a ceiling fan in at least one room of your house. Give our team a call at Nuzum Building Supply for everything you need for your project.

Your Step-by-Step Guide on How to Refurbish Old Doors

If your beloved front, back, or side door is starting to look worse for wear, then it’s time to break out your tools and get to work. By refurbishing your old door, you can bring it back to life and highlight everything you love about it. You will only need a little bit of know-how and a whole lot of gumption to get this project done right. So, if you’re ready to tackle this project, just follow these steps to refurbish your old door.

  1. Get All Your Tools and Supplies

To refurbish old doors and make them look like new again, you will need:

  • Flathead and Philips screwdrivers
  • Sawhorses
  • Drop cloths
  • Painter’s tape
  • Newspaper
  • Wood filler
  • Power sander
  • Tack Cloth
  • Sanding block
  • 120 to 240-grit sandpaper
  • Rags
  • Paintbrush
  • Wood stain
  • Clear varnish
  • Safety goggles
  • Dust mask

Once you have these items in hand, you can continue through the following steps. Remember to always wear your safety goggles and dust mask while sanding and staining.

  1. Take Off the Doorknob, Hinges, and Other Hardware

Using your screwdriver set, take the door out of the frame. Then, take it to your work area and place it across your sawhorses that are sitting over a drop cloth. Remove the doorknob, hinges, and all the other hardware. If the door has a window, tape it off with painter’s tape and newspaper.

  1. Sand to Remove the Old Finish

You must remove the old finish in full to restore the look of your door. To do so, start by putting 120-grit sandpaper on your power sander. Sand off the finish on all the flat surfaces on both sides while being careful to avoid rounding out any edges. Then, sand by hand around all the intricate details in the door using the same grit sandpaper. When sanding, use tack cloth to help pick up particles of dust to achieve a smoother look.

  1. Fill in All Imperfections and Sand Smooth

With the old stain removed, closely examine the door for imperfections. If you find any, fill them in with wood filler and let it dry as directed on the container. Then, come back with 240 grit sandpaper on your power sander and by hand to smooth out the entire door on both sides.

  1. Apply the Stain to the Surface

After your door is smooth to the touch, you can start applying the stain using your paintbrush. Work in small sections, saturating the wood with stain, and then wiping away the excess with a rag. Let the stain dry overnight and put on another coat if you want a darker finish. If you want a shinier finish, apply a coat or two of clear varnish after the stain dries.

  1. Reinstall the Hardware

Let the stain cure overnight once again. Then, grab your old hardware or any updated pieces you want to install and put them in place using your hand tools. If you’re using the old hardware, you may need to oil the hinges or doorknob to improve their function.

  1. Put Your Door Back Up

With all the hardware installed, you can put your door back up in its rightful place in your home. Then, be sure to step back and admire your hard work.


Although refurbishing doors is well worth the time and effort, you can skip all the trouble by getting a new door with help from our team at Nuzum Building Supply. We can help you find a door that complements your home design and exceeds all your expectations. So, give us a call today at 608-637-2116 to get started.

Interior Painting Tips: How to Paint Like a Pro

A fresh coat of paint can breathe new life into your home. Painting interior walls is something many homeowners choose to tackle themselves, but you don’t have to sacrifice the quality of the finished job if you do this as a DIY project. With these tips and quality products from Nuzum Building Supply, you can paint just like a pro!

  1. Preparation is Powerful

Before you begin, prep the surface carefully. Oil, grime, and dust on the wall will destroy the final look of your paint job. So will holes in the wall.

Check the surface of your wall for cracks, flaking, and peeling, and sand or scrape these areas to remove the texture. Then, apply a powerful cleaner to remove dust and stains. Fill in holes with putty and allow it to dry thoroughly. Wash grease spots with soap and water.

Prep the room, too. Use canvas drop cloths on floors and furniture that isn’t removable. Sheets won’t protect from paint bleeding through, and plastic is slippery if paint spills on it.

  1. Don’t Skimp on the Quality

Both your pant and your rollers and brushes should be high quality. You’re probably doing the job yourself to save a little money but skimping here will mean a far less effective pant job. Cheap brushes and rollers will shed on your wall, and cheap paint will require more coats, which will then end up costing more. Our Valspar Interior Paint is a great choice. It goes on smoothly and holds up well for years after you paint.

  1. Know When to Use Primer

Primer is helpful to give you a good finish on your paint job, but not every job requires it. Primer is ideal when you’re covering a pattern, such as a mural painted on the wall, or going from a dark color to a light color. It can also help you get an even coat if you’re painting with a very similar color to what you had before.

  1. Use Paint Extender

Paint extender gets mixed into your paint before you paint. It helps even out the paint, which means you won’t see any overlapped areas or brushstrokes. Extender also lengthens the drying time. While this might not seem like a good thing, it actually helps you by giving you more time to check for mistakes and fix them before the paint totally dries.

  1. Do One Wall at a Time

Complete one wall at a time, then step back and look over it carefully, fixing mistakes before moving to the next wall. This gives each wall in your home a seamless look, even if it makes the panting job take longer.

  1. Wash Paint Rollers

Paint rollers are the best tool to paint your walls because they evenly coat, but one problem with them is the fuzz they can leave behind. Washing them with hot water and dish soap will help. This removes the fuzz and fibers and conditions the roller for the work ahead. You can use them immediately even while they’re still wet.

  1. Light It Up

Shine a work light on the wall as you paint, especially in the edges where you have to switch to a brush instead of a roller. This will help you see all of the mistakes and fix them as you go. Even if the room seems well-lit, ad a work light.

Are you ready to get started on your project? Give us a call or visit one of our stores to talk to one of our sales representatives for help finding the perfect paint supplies.


5 Tips When Painting the Exterior of Your Home


There are a lot of decisions and preparations that go into painting your home’s exterior. You have to find the right paint color, use the right tools, and have some knowledge of what you are doing. It isn’t easy but that is why we have curated the best tips to help make exterior painting a breeze!

Here are 5 tips you should know when painting the exterior of your home:

  1. Consider Mother Nature – Don’t forget about the weather! It is important to pay attention to the weather if you are going to be outside all day painting. Select a dry time of the year when there is little rain and humidity. Paint needs to dry and will not adhere to surfaces correctly if they are not dry.
  2. Quality Over Price – The better the paint quality, the fewer times you’ll need to repaint over the years. Paint technology has improved so much that most colors are guaranteed to last longer than they have before. You may be tempted to save some money on cheaper paint, but that will only cause you more trouble, and more money down the road!
  3. Sand and Wash – Paint doesn’t adhere to wet surfaces, as well as dirty and rough surfaces. Clean the siding and trim around your house. Allow that to dry, then sand. This will ensure the smoothest paint finish.
  4. Use Primer – Its always been a rule to apply a good coat of primer before your color. This will have the color looking brighter and lasting longer. However, new paint technologies have combined paint and primer into one product, which ultimately will save you money compared to buying two separate products. If your perfect paint color doesn’t include primer in the mix, make sure you apply some before!
  5. Work from Top to Bottom – Start working your way from the top of the house to the bottom. This will help control streaks, as well as having you work with gravity rather than against it! Drips are going to happen, so this method will help you fix those as you are working rather than having to go backwards.


While painting the exterior of your home can be something you can do yourself, if you don’t feel prepared enough, that’s okay. Hiring a professional painter to get the labor done instead could be the better option. For advice and contractor recommendations, give the team at Nuzum Building Supply a call!

The Most Essential Tools for Your Toolkit

Being a homeowner is a big responsibility and having a handy toolkit nearby is essential. When something important breaks, chips or deteriorates, it is imperative to get it fixed. Paying someone else to do it or saving yourself some money and doing it yourself are the best options. If you are looking for a wide variety of power tools to add to your tool kit, Nuzum offers Makita products that make every job easier!

A lot of projects only require a few simple tools to complete. Having basic tools handy at home will make it convenient to complete easy home repairs. Whether your toolbox is in the garage, or you keep your necessary tools in a kitchen drawer, having the right kind of tools nearby is key to completing projects yourself!

• Cordless drill – There are endless possibilities when it comes to the use of a cordless drill. Use this power tool to insert screwdriver bits to remove screws or drilling pilot holes for screws and nails. When you want to get the job done efficiently and effectively, a cordless drill is important! Nuzum’s premium line of power tools, Makita, offers the perfect cordless drill for your kit!

• Assortment of nails and screws – You can find a variety of nails and screw sizes in prepackaged containers and your local home center, such as Nuzum.

• Screwdrivers – A good quality flat head screwdriver and a Phillips head screwdriver are the two most important kinds you will need in your toolkit. A set of tiny screwdrivers can be helpful as well when needing to tighten the screws on a pair of eyeglasses!

• Pliers – It is important to have a wide variety of shapes and sizes when it comes to pliers. Wire cutting pliers are also good for wiring and craft projects.

• Tape measure – Choose one long enough to measure a wide range of small and large furniture and spaces. A small tape measure that can fit in your pocket or purse can come in handy on the go as well!

• Level – Make sure your pictures are hanging level. A good, sturdy level will last a lifetime!

• Hammer – For hanging pictures or putting up shelving, consider different sizes of hammers for more delicate projects or heavy construction!

• Wire cutters – Ensure you do not damage your home scissors by using the correct type of wire cutters. Wire cutters make it easy to cut a wire when dealing with electrical repairs, crafts, and other projects!

• Blue painter’s tape – Professional and amateur painters use blue painter’s tape to mask off areas they want free of paint. Available in different widths and sizes, this special tape is made to be removed from surfaces without causing damage. You can tape off the edges of a door frame or tape down runners to protect the floor from scratches when moving large furniture!

• A pencil – Having a pencil handy will be of more use than you think. Use it to place a mark right where you need to drill a hole or record a measurement. It is important that it is a pencil and not a pen, so it is easy to remove!

The Barn Wood Phenomenon

barnwood

Cabins, rustic living, wood interiors: the trend of creating a living space that makes you feel “far away” but in your own home is growing and barn wood is something we are seeing a lot of folks as for. We now carry barn wood that looks reclaimed and rustic but is new and will make your house look wonderful!

Continue reading “The Barn Wood Phenomenon”